Orchid Care Without Guesswork (Pot Weight, Hand Shadow, 10°F Drop)
Give an orchid bright, indirect light, water it only when the potting mix runs nearly dry, and keep it in an open bark or moss mix instead of soil, and you’ve solved most of what kills houseplant orchids. Add humidity in the 40–60% range, a cooler night than day, and a diluted feeding regularly, and reblooming stops being a mystery. Right now: move the pot to a spot where you can read fine print in its shadow, and lift it to feel whether it’s actually light enough to need water.
TL;DR:
- Orchids require a natural light level of about 1,000 to 2,500 foot candles (roughly 10,000 to 27,000 lux), achieved through east or south windows, with supplemental LED lighting if needed.
- Water orchids only when the potting medium feels dry by weight or texture, typically every 5 to 12 days, avoiding soggy conditions that cause root rot.
- Indoor humidity should be maintained between 40 and 60 percent, using pebble trays, humidifiers, or grouping plants to prevent leaf browning and bud drop.
- Nighttime temperature drops of approximately 10°F are critical for triggering blooming, especially in autumn, alongside increased light and proper feeding.
- Proper potting mixes consist of chunky bark or moss, and repotting every 1 to 2 years prevents the medium from breaking down and suffocating roots.
Table of Contents
- What Does Proper Orchid Care Actually Require?
- How Much Light Do Orchids Need?
- How Often Should You Water an Orchid?
- What Humidity Level Do Orchids Need Indoors?
- What Temperature Range Keeps Orchids Healthy?
- Why Do Orchids Need Special Potting Mix?
- How Should You Fertilize Orchids?
- Which Orchids Are Easiest for Beginners?
- How Do You Get an Orchid to Rebloom?
- How Do You Spot and Treat Common Orchid Pests?
- What Should Seasonal Orchid Care Look Like?
- How Do You Propagate Orchids at Home?
- How Do You Recognize Orchid Stress Beyond Pests?
- How Do You Choose the Right Orchid Pot?
- How Do You Acclimate a New Orchid at Home?
- What Long-Term Orchid Growers Get Right
- Let Viridia Handle the Small Recurring Tasks
- Sources
- FAQ
What Does Proper Orchid Care Actually Require?
Orchid care comes down to recreating a rainforest branch indoors: bright but filtered light, roots that dry between soakings, air that moves, and a growing medium that never holds standing water. Get those four variables right and the specific species matters far less than most beginners assume.
That’s the real shift in thinking. Most orchid problems trace back to one of a handful of causes: too little light, too much water, dead air, or a potting mix that’s collapsed into mush. The New York Botanical Garden’s culture guidance frames it plainly: success means matching light, temperature, humidity, medium, and ventilation to what the plant evolved to tolerate, not forcing the plant to adjust to your living room. Once you accept that framing, every other decision, from where you put the pot to how often you water it, gets a lot simpler.
How Much Light Do Orchids Need?
Light requirements split roughly into three tiers, and mismatching them is the single biggest reason orchids sit green and leafy for years without a flower. Phalaenopsis, the moth orchid sold at every grocery store, wants low to medium light and actually sunburns on a bright south windowsill. Cattleya and Vanda want considerably more, closer to what a tomato plant would tolerate. Dendrobium falls in between, tolerating medium to fairly bright conditions depending on the cultivar.
You can test this with your hand instead of guessing. Hold your hand about a foot above the leaves, between the plant and the light source. A sharp, well-defined shadow means high light. A soft, fuzzy shadow with visible edges means medium light, the sweet spot for most Phalaenopsis. Almost no shadow at all means the spot is too dark to support blooming, even if the leaves look healthy.
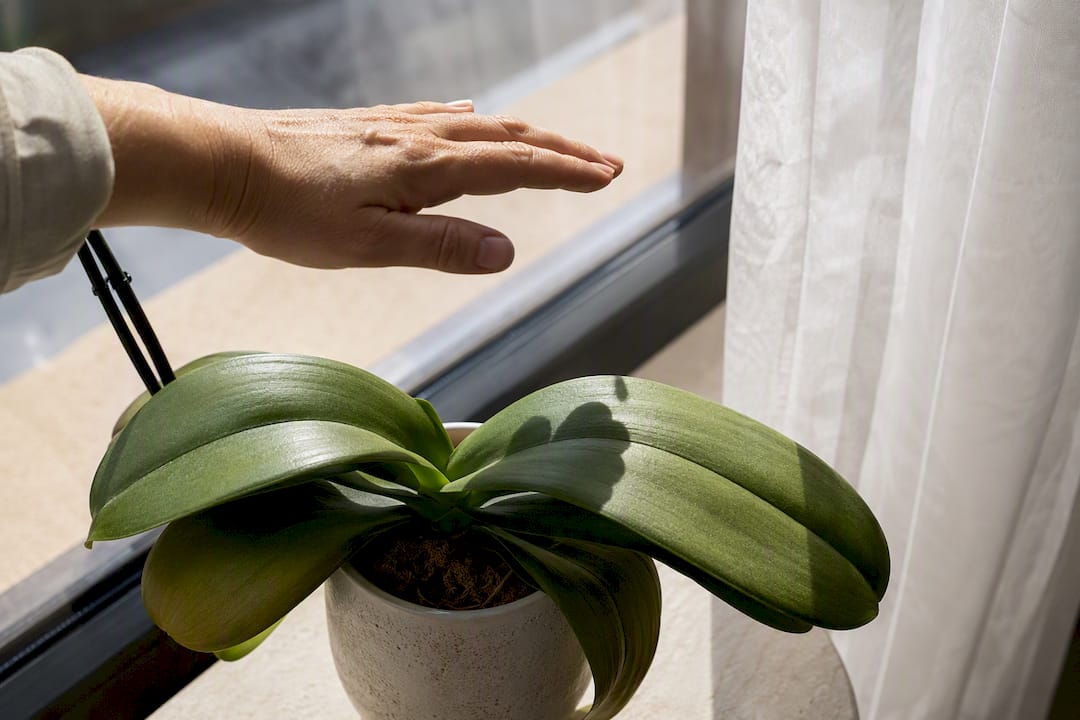
An east-facing window with sheer curtains or an unobstructed south window a few feet back from the glass usually lands in that medium range. Direct midday summer sun through unfiltered south or west glass will scorch leaves, showing up as bleached or blackened patches within days. Inadequate light, meanwhile, is one of the most common reasons orchids refuse to rebloom even when everything else is right.
When natural light falls short, especially in winter or in rooms without south-facing windows, full-spectrum LED or fluorescent fixtures fill the gap. Position tubes or panels 4 to 12 inches above the foliage and run them 12 to 16 hours a day to mimic a natural photoperiod.
- East window with sheer curtain, or south window set back 3 to 5 feet
- No direct midday sun between roughly 11 a.m. and 3 p.m.
- Fixture height of 4 to 12 inches for supplemental LEDs
- 12 to 16 hours of artificial light per day, on a timer
Pro Tip: Skip the guesswork and download a free light meter app for your phone, or buy a $15 handheld lux meter. Phalaenopsis generally does well around 1,000 to 1,500 foot candles, while Cattleya wants closer to 2,500 to 4,000. Measure at leaf height, not from across the room.
How Often Should You Water an Orchid?
Overwatering, not underwatering, is the leading cause of orchid death, and the reason is biological rather than a matter of carelessness. Most houseplant orchids are epiphytes: in the wild, their roots cling to tree bark, wrapped in air, not buried in soil. Those roots need oxygen almost as much as they need moisture, and a pot that stays soggy suffocates them, inviting rot within days.
Forget calendar watering. A schedule that says “every Sunday” ignores the fact that a plant near a heating vent dries out three times faster than one in a cool, humid bathroom. The American Orchid Society recommends testing the medium directly instead: lift the pot. A pot that feels notably lighter than it did right after watering is ready for more. If you’re unsure, push a wooden skewer into the bark and pull it out. Damp, dark wood means wait. Dry, pale wood means water now. You can also just poke a finger an inch into the mix; bark that’s cool and moist to the touch still has days left before it needs attention.
Here’s a routine that works for most Phalaenopsis and Dendrobium in bark mix, indoors, at typical room temperature:
- Check pot weight or the skewer test every 2 to 3 days rather than watering on autopilot.
- When the mix reads dry, carry the pot to a sink and run room-temperature water through it for 15 to 20 seconds.
- Let it drain completely for 10 to 15 minutes; never let the pot sit in a saucer of standing water.
- Return it to its spot only once water has stopped dripping from the drainage holes.
- Repeat once the medium reads dry again, typically every 5 to 12 days depending on light, pot size, and season.
Water individual plants under running water or in their own basin rather than dunking several pots in one shared bucket, since that habit spreads rot and bacterial infections between plants that otherwise show no symptoms.
Overwatering is consistently cited as the number one killer of home orchids, ahead of poor light, pests, or low humidity combined, according to the American Orchid Society’s watering guidance. If you’re going to err in one direction, err dry.
What Humidity Level Do Orchids Need Indoors?
Most orchids want moderate relative humidity often higher than found in typical homes, a range that the average American home, especially with a furnace or AC running, rarely reaches on its own. Winter heating can drag indoor humidity down into the teens or twenties, well below what any orchid tolerates comfortably, and that’s when leaf tips start browning and flower buds drop before opening.
You don’t need a greenhouse to close that gap. A pebble tray, a shallow dish of gravel topped with water and the pot set on top rather than in the water, raises humidity right around the plant without waterlogging roots. Grouping several orchids together creates a shared microclimate that’s noticeably more humid than a single isolated pot. A small ultrasonic humidifier set nearby, running a few hours a day, handles the rest in dry climates. Lining the pot’s surface with live sphagnum moss adds a slow, steady moisture source between waterings.
Bathrooms with a window get mentioned constantly as a natural fit, and the humidity from showers genuinely helps, but only if the room also gets adequate light; a dim bathroom just trades one problem for another.
Humidity without airflow, though, is an invitation to fungal and bacterial disease. Standing moist air around leaves and crowns is exactly what rot organisms need to take hold. A small fan set on low, running continuously or on a timer nearby (not blasting directly on the plant), keeps air moving across the foliage and dries morning condensation before it becomes a problem.
- Pebble tray under (not touching) the pot
- Small humidifier on a timer, running a few hours daily
- Grouped plants for a shared humid pocket
- Low-speed fan nearby for constant gentle air movement
Pro Tip: A $10 digital hygrometer tells you your actual humidity number instead of a guess. Most read shockingly lower than people expect, often in the 25 to 35% range in winter, which explains a lot of stalled growth.
What Temperature Range Keeps Orchids Healthy?
Temperature preferences split into three broad bands. Warm growers like Phalaenopsis and many Dendrobium like daytime temperatures around 75 to 85°F and nights no cooler than 65°F. Intermediate growers like Cattleya tolerate days near 70 to 80°F with nights around 60 to 65°F. Cool growers like Cymbidium prefer days closer to 70 to 75°F but genuinely need nights that drop into the 50s to set flower spikes.
That night drop matters more than most beginners realize. A nighttime temperature dip of roughly 10°F below the daytime high, sustained for several weeks in autumn, signals many orchids to shift from making leaves to making flower spikes. You can create this indoors just by lowering the thermostat overnight, cracking a window in a spare room, or moving the plant to a naturally cooler space like an unheated sunporch for a few autumn weeks.

If a mature, healthy-looking orchid with good roots and strong leaves still won’t spike year after year, temperature is often the missing piece, not light or fertilizer. A plant that never experiences a real seasonal night drop can sit vegetative indefinitely.
Why Do Orchids Need Special Potting Mix?
Garden soil and bagged landscape mulch will kill an epiphytic orchid, usually within a couple of months, because they hold water against the roots and cut off the oxygen those roots evolved to depend on. Orchid roots need air pockets between particles, not compacted, water-retentive dirt.
Standard mixes use medium-grade fir bark, often blended with charcoal for freshness, perlite for aeration, and sometimes coarse sphagnum moss or chunks of tree fern fiber for plants that like extra moisture retention. Plastic pots with generous drainage holes work well for most growers since they’re light and easy to check by feel; unglazed clay pots dry faster and suit growers who tend to overwater.
You’ll know the mix has broken down when it looks less like chunky bark and more like dark, fine coffee grounds. That texture change means the medium is losing its air pockets and starting to hold water the way soil does, which is exactly what you don’t want.
- Water the plant a day ahead so roots are pliable, not brittle, before you disturb them.
- Gently remove the plant and shake or rinse off the old, broken-down mix.
- Trim any soft, brown, or hollow roots with sterilized scissors, leaving firm white or green ones intact.
- Set the plant in a pot sized just slightly larger than its root mass and fill in fresh bark mix, working it gently between roots.
- Skip watering for 2 to 3 days to let any cut surfaces callus over before the next soak.
Repot roughly every 1 to 2 years for most bark mixes, or when you see the coffee ground texture, and avoid repotting a plant that’s actively in heavy bloom.
Pro Tip: Squeeze a handful of used mix. If it stays compacted and feels heavy and wet rather than springing back loosely, it’s time to repot regardless of how long it’s been.
How Should You Fertilize Orchids?
A balanced, water-soluble orchid fertilizer applied at half the label’s recommended strength, once a week during active growth, covers nearly every home orchid without risking burned roots. Some growers switch to a bloom-booster formula with a higher middle number, something like a 10-30-20 ratio, for a few weeks right as a spike begins forming, then return to a balanced feed once flowers open.
Water the mix first, then fertilize, never the reverse; feeding dry roots concentrates salts right against tissue that’s already stressed for moisture. Cut back to feeding every other week or monthly during shorter winter days when growth slows naturally. Once a month, skip the fertilizer entirely and run plain water through the pot as a flush, since accumulated mineral salts show up as blackened root tips and crispy leaf margins long before you’d suspect nutrition as the cause.
More fertilizer is not better. Excess feeding pushes soft, weak growth that pests target first and rarely produces a corresponding increase in flowers.
Which Orchids Are Easiest for Beginners?
Phalaenopsis tolerates the low, indirect light of a typical living room and forgives a missed watering better than most flowering houseplants, which is exactly why it dominates grocery store shelves. Paphiopedilum, the lady’s slipper orchid, likes similarly modest light and prefers to stay slightly more evenly moist than Phalaenopsis, making it a natural next step. Cattleya and Dendrobium need brighter light but reward a sunnier window with fragrant, showier flowers than either of the above.
Genera like these have been bred over decades specifically for indoor vigor and reduced light needs, which is why they succeed on windowsills where a wild species collected from a cloud forest canopy would fail outright.
Before buying, run through a quick check at the store or nursery:
- Look for a flowering-size plant with at least 2 to 3 healthy leaves.
- Check roots through the pot or at the surface. They should look plump and silvery green or white, not shriveled or black.
- Avoid pots so crowded with growth that air can’t circulate around the base.
- Inspect leaf undersides and crevices for sticky residue, webbing, or small bumps, all signs of pests already on board.
Match the choice to your actual space. A north-facing apartment with no supplemental lighting points toward Phalaenopsis or Paphiopedilum. A sunny south or west window points toward Cattleya or Dendrobium, where the extra light finally gets used instead of wasted.
How Do You Get an Orchid to Rebloom?
Once flowers fade on a Phalaenopsis spike, you have a choice: cut the entire spike near the base to redirect energy into new leaf and root growth, or cut just above one of the small nodes along the spike, which sometimes triggers a secondary bloom from that same stem. The second option works more often on younger, vigorous plants than on ones that just finished a long bloom cycle.
Autumn is the window that matters most for next season’s flowers. Combine a modest feeding bump with a genuine nighttime temperature drop, and increase available light slightly if the plant has been sitting in deep shade all summer. Those three cues together, cooler nights, a touch more light, and steady feeding, are what most consistently push a mature plant into spiking.
A short checklist for the months before expected bloom:
- Late summer: resume or increase weekly dilute feeding as growth picks back up.
- Early autumn: start allowing nights to run about 10°F cooler than daytime highs.
- Mid autumn: watch for a new spike emerging from the base of a leaf; once you see it, feeding shifts toward a bloom formula.
- Through bloom: hold steady on light and temperature and avoid repotting until flowers finish.
How Do You Spot and Treat Common Orchid Pests?
Mealybugs show up as small white cottony clusters tucked into leaf joints and along root crowns, while spider mites leave a fine stippling or webbing usually visible on leaf undersides in bright light. Scale insects look like tiny brown bumps stuck flat against leaves and stems, and thrips leave silvery streaking on leaf surfaces and can distort new flower buds.
For all four, isolate the affected plant immediately so pests don’t spread through a windowsill collection. A cotton swab dipped in isopropyl alcohol wipes mealybugs and scale off directly on contact. A strong, gentle rinse in the sink dislodges spider mites, and repeating that every few days for two weeks usually breaks their life cycle without chemicals.
- Isolate any plant with visible pests before treating.
- Swab mealybugs and scale with alcohol on a cotton ball.
- Rinse spider mites and thrips off with a firm spray of room-temperature water.
- Recheck weekly for two to three weeks since eggs hatch in waves.
Disease is a different, more urgent conversation. Root rot shows up as mushy, blackened, or hollow roots that pull apart with light pressure, usually traced back to a pot that stayed wet too long. Bacterial soft rot spreads fast, turning leaf tissue translucent and mushy almost overnight, and it can move plant to plant through shared water. A plant with widespread bacterial rot or clear viral mottling on new leaves is often not worth trying to save; isolate and discard it rather than risk your other plants.
Pro Tip: Sterilize cutting tools with a flame or alcohol wipe between every single plant, not just between species. A pair of scissors is the fastest way bacterial and viral problems jump from one orchid to your entire collection.
What Should Seasonal Orchid Care Look Like?
Orchid needs shift noticeably across the year, and adjusting your routine by season prevents most of the stress that shows up as yellowing leaves or dropped buds.
- Spring: Growth accelerates as light increases. Step up watering frequency slightly, resume or increase weekly dilute fertilizing, and repot any plant whose mix has broken down, since new root growth this season heals fastest.
- Summer: Heat and pests both peak. Increase airflow to offset higher humidity from AC cycling, watch closely for spider mites and thrips, which multiply faster in warm weather, and keep an eye on plants near windows for sunburn as the sun angle shifts higher.
- Autumn: This is spike season. Introduce the 10°F night drop where possible, shift feeding toward a bloom-booster formula once a spike appears, and take advantage of milder outdoor temperatures if you’ve had orchids summering outside; bring them in before nights dip near 55°F.
- Winter: Growth slows for most genera. Cut back watering frequency since lower light and cooler air both slow drying, add supplemental light or extend humidifier use as heating systems dry the air, and hold off on repotting until spring.
How Do You Propagate Orchids at Home?
Two methods cover almost every home orchid propagation situation: division and keiki removal, and which one applies depends entirely on how the plant grows.
Sympodial orchids, ones like Cattleya and Dendrobium that spread sideways by producing new growths from a rhizome, can be divided once a mature clump has at least 8 to 10 healthy growths. Cut through the rhizome with a sterilized blade, keeping at least 3 to 4 growths per division, and pot each section separately in fresh bark mix. Expect the divided sections to skip flowering for a season while they reestablish roots.
Monopodial orchids, including Phalaenopsis, grow from a single central stem and don’t divide the same way, but they often produce a keiki, a small plantlet, along a spent flower spike or occasionally at the base. A keiki is ready to remove once it has developed its own roots at least 2 inches long. Cut it free from the parent spike with a sterilized blade, dust the cut ends lightly, and pot the keiki in a small container with fine bark or sphagnum moss, keeping humidity a bit higher than usual while it establishes.
Neither method is difficult, but both demand patience. A division or keiki typically needs a full year, sometimes two, before it flowers on its own.
How Do You Recognize Orchid Stress Beyond Pests?
Leaves and roots tell you what’s wrong well before a plant collapses, if you know what to look for. Root rot presents as roots that have turned brown or black and feel soft or hollow rather than firm, often accompanied by a musty smell when you unpot the plant, and it almost always traces back to a pot that stayed wet too long between waterings.
Leaf spotting has a few distinct causes worth telling apart. Sunken, water-soaked-looking spots that spread quickly usually point to a bacterial or fungal infection, often triggered by water sitting in the crown after watering. Dry, papery brown patches with defined edges are more often sunburn from too much direct light. Yellowing that starts at the oldest, lowest leaf and moves upward is frequently just natural leaf aging, not disease, especially if only one leaf at a time is affected.
Wrinkled or pleated leaves signal a plant that’s been underwatered or that has damaged roots unable to take up enough moisture, even if you’ve been watering on schedule. Crown rot, a soft, blackened center where new leaves emerge, is often fatal if it reaches the growing point, and it typically starts because water pooled in the crown after watering and never dried out.
Catching these signs early, before rot spreads past a root or two, is what separates a plant you can save with a quick repot and root trim from one you’ll eventually have to discard.
How Do You Choose the Right Orchid Pot?
Drainage matters more than material for most growers, but material still shapes how forgiving a pot is. Plastic pots with multiple drainage holes are lightweight, let you see and feel root health through the wall on clear versions, and dry at a moderate, predictable rate that suits most beginners.
Unglazed terra cotta dries noticeably faster since the material itself wicks moisture out through its walls, which helps growers prone to overwatering but can stress plants in hot, dry climates if you’re not watering often enough to compensate. Specialized orchid pots with slotted sides, common for Cattleya and other high-light growers, maximize airflow to the roots at the cost of drying out faster still.
Whatever material you choose, size the pot to the root mass, not the visible foliage. A pot that’s too large holds excess damp mix around roots that haven’t grown enough to absorb that moisture, which is one of the quieter causes of rot in newly repotted plants. A snug fit, with maybe an inch of room around the root ball, keeps the mix drying at a pace the roots can actually keep up with.
How Do You Acclimate a New Orchid at Home?
An orchid that just traveled from a greenhouse, a grocery store, or a shipping box has spent days in different light, humidity, and temperature than your home offers, and a slow transition prevents the shock that shows up as dropped buds or yellowing leaves within the first week.
Unwrap any packaging or sleeve immediately, since trapped moisture inside plastic sleeves breeds rot fast. Resist repotting right away even if the mix looks unfamiliar; give the plant two to three weeks in its current pot to adjust before disturbing the roots. Place it initially in slightly lower light than its long-term spot and step that up gradually over a week or two rather than moving it straight into a bright south window.
Hold off on fertilizing for the first two to three weeks, and check watering needs more frequently than usual during this period since travel stress changes how a plant uses moisture. Bud or flower drop in the first week or two after a move is common and usually not fatal. It reflects the shock of the transition rather than a permanent problem, and new growth typically resumes once the plant settles into its new light and humidity.
What Long-Term Orchid Growers Get Right
The growers who keep orchids alive for decades aren’t running some elaborate system. They’re checking on their plants constantly, in small, low-effort ways: lifting a pot to feel its weight before deciding whether to water, glancing at new leaf growth for subtle changes, noting whether a hygrometer reading has drifted since last week.
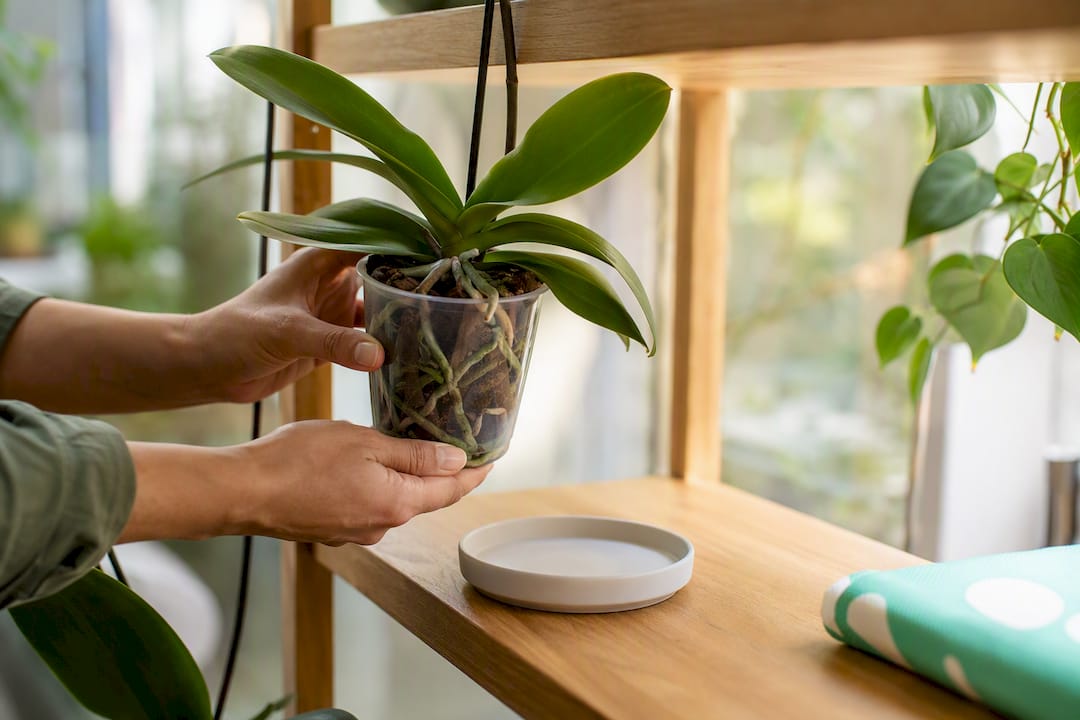
That weekly habit matters more than any fertilizer brand or potting mix recipe. Rigid schedules fail because no two windowsills, seasons, or heating systems behave the same way, and a plant that gets watered “because it’s Sunday” regardless of how dry it actually is will eventually rot. Watch the plant, not the calendar.
A hygrometer costs less than a good bottle of wine and tells you more about your growing conditions than a stack of care guides ever will. Pair that with the pot weight habit, and you catch problems, drooping roots, a slipping humidity trend, a light spot gone dim as trees leaf out in spring, weeks before they show up as damage you can’t reverse.
— Dan
Let Viridia Handle the Small Recurring Tasks
Every routine in this guide, checking pot weight, tracking humidity trends, remembering when a fertilizer flush is due, gets easier with a second set of eyes. Viridia identifies your orchid from a photo, pulls up care guidance tailored to your climate, and sends reminders timed to your actual watering rhythm instead of a generic calendar.

Beyond reminders, Viridia’s health diagnosis feature spots early trouble, a spotted leaf, a shriveling root, before it turns into a plant you have to discard, and suggests a treatment while tracking whether that treatment is actually working over the following weeks. You can browse Viridia’s full plant catalog for species-specific notes on everything from orchids to the trees in your yard, and share your own growing wins with a community of other gardeners troubleshooting the same seasonal problems you are.
If you’d rather stop guessing at pot weight and light levels and let an app track the pattern for you, start with a free account at Viridia and add your orchid as your first plant.
Sources
- New York Botanical Garden: Orchid care (comprehensive culture guidance)
- American Orchid Society: Watering techniques for success
- Fairchild Tropical Botanic Garden: Basic orchid culture
- Chicago Botanic Garden: Tips on watering orchids
- Clemson University: Orchids factsheet (pests, species, and cultural notes)
FAQ
What do you do with an orchid after the blooms fall off?
Cut the spent flower spike either at its base or just above a lower node if it’s a Phalaenopsis, since cutting above a node occasionally triggers a second bloom on the same stem. Resume regular watering and light feeding to support new leaf and root growth for the next cycle.
How do I take care of an indoor orchid day to day?
Place it in bright, indirect light tested with the hand-shadow method, water only when the pot feels light or a skewer comes out dry, and keep humidity around 40 to 60% with a pebble tray or nearby humidifier. Feed at half strength weekly during active growth and repot every 1 to 2 years once the bark mix breaks down.
What is the real secret to keeping orchids alive?
Match the plant to your actual light and humidity conditions rather than forcing it to adapt, and water based on how dry the potting medium actually feels rather than a fixed schedule. An app like Viridia can help by tracking those signals for you and flagging changes before they become problems.
How do I keep my orchid blooming year after year?
Give it a genuine autumn nighttime temperature drop of about 10°F for several weeks, paired with a slight increase in light and a shift toward a bloom-booster fertilizer once a spike appears. Reblooming failure almost always traces back to insufficient light or a missing seasonal temperature cue, not a lack of fertilizer.
How often should I fertilize my orchid?
Use a diluted, water-soluble orchid fertilizer at half label strength about once a week during active growth, cutting back to every other week or monthly in winter. Flush the pot with plain water once a month to prevent salt buildup in the roots.